Terminating Cat6 and Cat6a Cables

Introduction to Cat6 and Cat6a
Cat6 cables were first introduced in 2002, quickly becoming the industry standard by superseding Cat5 thanks to their improved performance. In 2009, Cat6a cables emerged, offering:
- Twice the frequency capacity of Cat6 at up to 500 MHz.
- The ability to maintain 10 Gbps network speeds over distances of up to 100m.
By comparison, Cat6 cables can only sustain 10 Gbps over a maximum of 55m, making them less suitable for large-scale networks where speed and distance are critical.
While Cat7 cables, launched alongside Cat6 in 2002, boast frequencies of up to 600 MHz, they have failed to gain significant market traction. As a result, Cat6 and Cat6a remain the industry standards for reliable and cost-effective networking solutions.
Choosing Between Cat6 and Cat6a
When deciding on the right cable for your project, consider the following:
- Cost: Cat6 is more affordable than Cat6a.
- Performance:
- Cat6: Ideal for smaller installations, but limited to 55m for 10 Gbps speeds.
- Cat6a: The superior option for high-speed, large-scale networks with 10 Gbps speeds maintained over 100m.
- Compatibility: Cat6a cables are backwards compatible with Cat6. Both use identical connectors, simplifying upgrades and mixed installations.
Each project is unique, so it’s essential to weigh performance needs against your budget and long-term goals.
Terminating data Cables
The Importance of Terminating Data Cables
Terminating Ethernet cables, such as Cat6 and Cat6a, is essential for:
- Custom Network Installations: Tailoring cable lengths to fit specific layouts.
- Repairing Damaged Cables: Ensuring networks remain operational without replacing entire cable runs.
Proper termination prevents excessive cable lengths, which can cause:
- Tangled wires
- Trip hazards
- Unnecessary signal degradation
How to Terminate Cat6 and Cat6a Cables
Terminating Ethernet cables is a straightforward process for IT professionals and can often be completed within 15 minutes. Here’s how:
- Tools and Preparation: Gather the necessary tools, including:
- Cable crimper
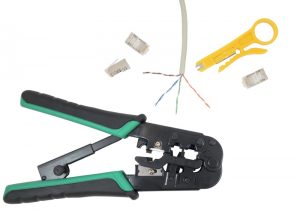
- Wire stripper
- Boot connectors with ground strips
- Cat6 or Cat6a cable roll
- Cable crimper
- Measuring and Cutting:
- Unravel the cable and measure it to the desired length.
- Cut the cable cleanly to avoid jagged ends.
- Stripping and Pairing:
- Strip the outer sheath to expose the twisted pairs of wires.
- Separate the wires into their respective pairs (ensure the same order is maintained at both ends).
- Inserting into Connectors:
- Insert the wires into a boot connector, aligning them correctly to ensure proper grounding and performance.
- Crimping and Testing:
- Use a crimping tool to secure the connector.
- Test the cable to confirm connectivity and performance.
For professionals, terminating cables like Cat6 and Cat6a is routine, ensuring tailored networks that minimise cost, clutter, and downtime.
Cat6 and Cat6a for Larger Networks
While both Cat6 and Cat6a cables can coexist within the same network thanks to their compatibility, Cat6a is the preferred choice for larger, high-performance networks. Its ability to maintain speeds over long distances makes it ideal for:
- Data Centres
- Enterprise Networks
- High-Bandwidth Applications
Learn More About Terminating Cables
- Watch our video on Terminating Data Cables for a step-by-step demonstration.
- Explore our Data Cabling FAQs for insights into CAT systems, data cabling terminology, and network solutions.
View our video on Terminating Data Cables
Professional Data Cabling Services
For expert assistance with structured cabling design, termination, and installation, trust NM Cabling to deliver reliable, high-performance networking solutions tailored to your project’s needs.